
|
|
PHOTOGRAPHY TIPSWith these tips, I try to give a unique approach to photography, different from what is already availble on the internet |
|
|
TIP 1: Shoot into the sun
As most people know by now, the most beautiful photos are usually created during the "golden hour" (the first hour after sunrise and the last hour before sunset).
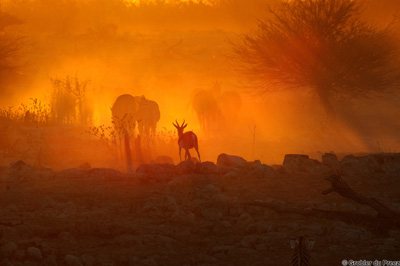
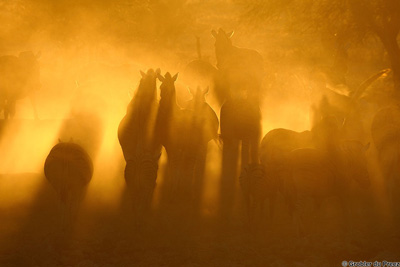
What is also widely taught, is that you must always shoot with the sun at your back (except for sunrise/sunset photos). This is an untruth - some of my best photos ever were shot nearly directly into the sun.
The photo below was shot about 10 minutes before sunset when the sun was only a few degrees above and to the side of the subject. If there is dust in the air, shoot into the sun, but be careful not to shoot before the intensity of the sunlight is low enough not to damage your eyes.
This type of photo you usually cannot see with the naked eye as the light is too sharp to see clearly.
Always use a tripod and remote control or the camera timer to reduce camera shake.
Nikon D300s, Sigma 50-500 at 420mm, f11, 1/160 s, ISO 200, tripod. I used the camera timer on 2 seconds to further decrease camera shake.
Sunset at the Okaukeujo waterhole, Etosha National Park, Namibia.
|
|
TIP 2: Shooting a wide scene without using a wide-angle lens
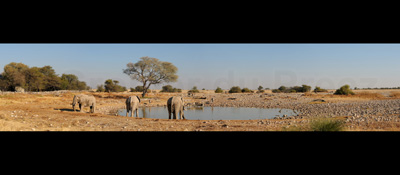
By making stitched panoramas using a 24 mm or longer lens, you get get a more natural photo without the distortion of an ultra wide zoom like the 12-24. If I used my 12-24 zoom lens at 12mm, I could have fitted the whole scene in one shot, but the extreme ends of the photo would have been
distorted. This method also gives a larger image with more megapixels which could be printed at a larger size.
Put your camera on a tripod (hand-held could also work if no tripod), make sure your horizon is level, and shoot a few photos, ensuring that adjacent photos overlap. Manual exposure works best to ensure that all photos have the same exposure. Use a program like the Photomerge function in Photoshop to combine the photos. You will have to crop the final product to make it presentable.
Elephants at the Okaukeujo waterhole, Etosha National Park, Namibia
Panorama made from 3 separate photos using the Photomerge function in Photoshop CS4 |
|
TIP 3: Wildlife photos during the golden hour or at night
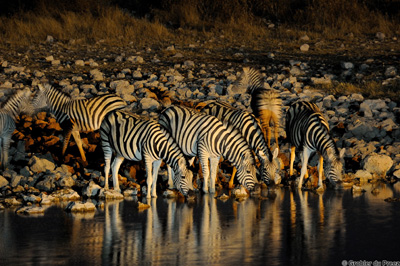
As most people know by now, the most beautiful photos are usually created during the "golden hour" (the first hour after sunrise and the last hour before sunset). Unfortunately, the light intensity during the golden hour is very low and makes it difficult to get sharp photos. The fact that wildlife seldom stands still, makes it more difficult. Even with a high ISO setting it is difficult to get sharp photos.
It is, however, possible to get good wildlife photos in those conditions. Use a tripod at all times, even if you use a cheap point and shoot camera. You will see the difference. If possible, use a remote trigger or use the camera timer to further reduce camera shake. Even a cell phone camera could take much better photos if you use some sort of support to stabilise it. Many of the photos taken this way will show blur due to subject movement, so take many photos.
The photo to the left was taken at a floodlight lit waterhole without a flash after the sun has set with the camera on a tripod. I used the camera timer on 2 seconds to further reduce camera shake. The settings were as follow:
Shutter speed: 1/6 second, ISO: 1600, aperture: f6.3, focal length: 270mm
|
|
TIP 4: The difference between a great photograph and an average photograph
How many times, when looking at a beautiful photograph, have you heard or said “he/she (the photographer) was at the right place at the right time” or, “he/she is an excellent photographer”?
Yes, sometimes it just happens that you are at the right place at the right time, but you still must have some knowledge of composition and must know the basics of photography. It usually is not about coincidence or great skills. It is about planning, hard work, sacrifice, long hours and discipline
1. Coincidence
2. Long hours
3. Hard work
4. Planning
5. Discipline |
|
TIP 5: Shooting during harsh light conditions (outside of the golden hour)
As most people know by now, the most beautiful photos are usually created during the "golden hour" (the first hour after sunrise and the last hour before sunset). Unfortunately, the time when we are at a specific location isn’t always under our control. Photos taken during harsh lighting conditions often have dark shadows with little detail and/or washed out white patches.
To get good photos and make the best of your unfortunate situation, you could use a combination of the following nine (9) tips:
5. Post processing
6. Use fill flash
7. Collapsible shade
8. Interesting subjects override bad light
9. Exposure bracketing and HDR (High Dynamic Range) processing
10. If all of the above fail
|
| © Grobler du Preez All rights reserved | |
